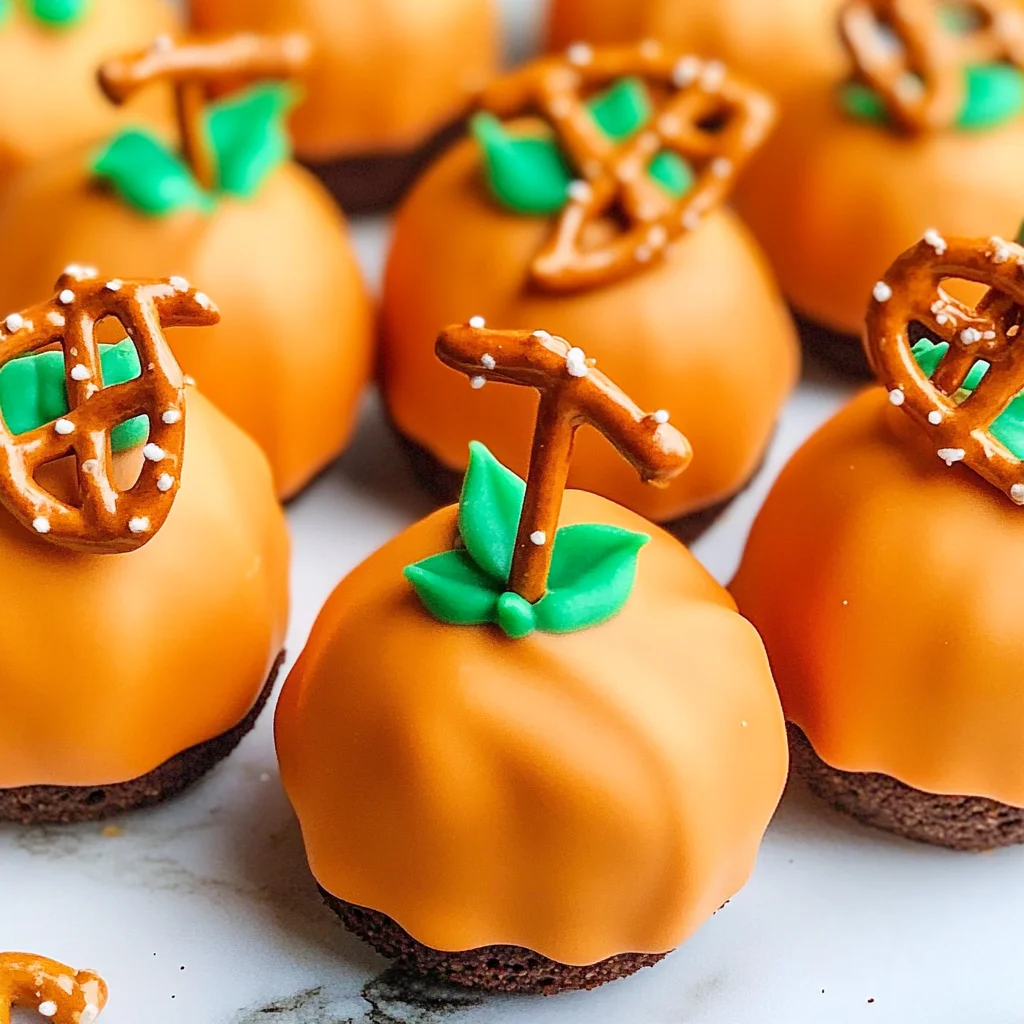
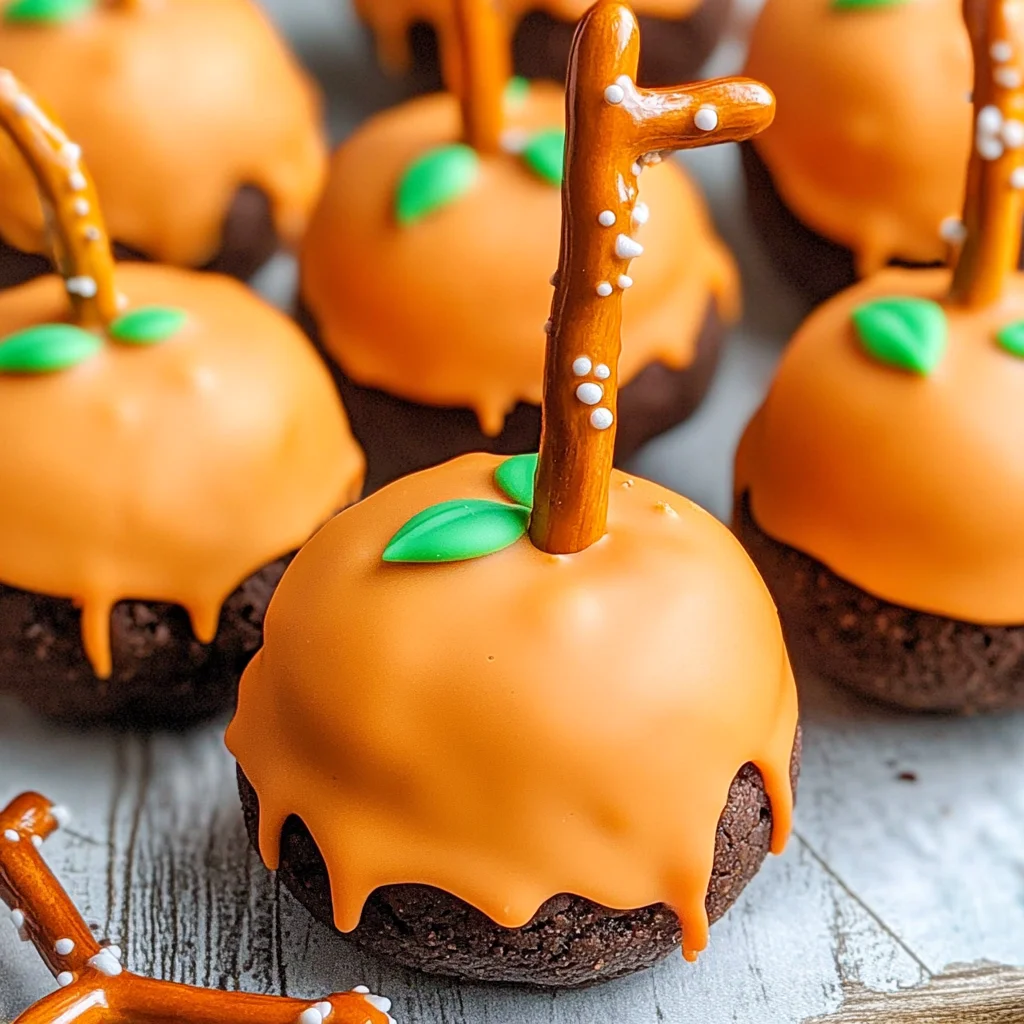
Pumpkin Oreo Balls
If you’re looking for a fun and festive treat that’s as easy to make as it is delicious, you’ve come to the right place! These Pumpkin Oreo Balls are a delightful no-bake dessert that captures all the cozy flavors of fall. They’re perfect for everything from family gatherings to Halloween parties or even just a sweet afternoon snack. The combination of creamy cream cheese and crunchy Oreos is hard to resist, and the cheerful pumpkin decorations make them a hit with everyone!
What makes this recipe truly special is how simple it is. With just a handful of ingredients, you can whip up these adorable treats in no time. Plus, they’re great for making ahead of time—just pop them in the refrigerator until you’re ready to serve!
Why You’ll Love This Recipe
- Super Easy to Make: No baking required! Just mix, shape, and chill for a stress-free dessert.
- Kid-Friendly Fun: Kids will love helping out in the kitchen and decorating their own pumpkin balls!
- Perfect for Any Occasion: Whether it’s a holiday party or a family night in, these treats fit right in.
- Make Ahead Convenience: Prepare them in advance and keep them refrigerated until it’s time to enjoy.
- Irresistibly Delicious: The combination of Oreo cookies and cream cheese is simply unbeatable!
Ingredients You’ll Need
These Pumpkin Oreo Balls use simple, wholesome ingredients that you might already have at home. You’ll be amazed at how easy it is to create this delicious treat!
For the Pumpkin Oreo Balls
- 36 Oreo cookies
- 8 oz cream cheese (softened)
- 12 oz orange candy melts
Variations
This recipe is flexible, allowing you to get creative based on your preferences or what you have on hand. Here are some fun variations to try:
- Add Some Spice: Mix in a pinch of cinnamon or nutmeg with the cream cheese for an extra autumn flavor.
- Change Up the Coating: If orange isn’t your color, try using white or dark chocolate melts instead for a different look!
- Ditch the Pretzels: Replace pretzel sticks with candy corn or mini chocolate chips for a different decoration.
- Make Them Mini: Use mini Oreos instead of regular ones for bite-sized treats that are perfect for sharing.
How to Make Pumpkin Oreo Balls
Step 1: Crush the Oreos
Start by pulsing the Oreo cookies in a food processor until they turn into fine crumbs. This step is essential because it creates the base for our creamy filling. If you don’t have a food processor, placing them in a zip-top bag and crushing them with a rolling pin works too!
Step 2: Combine with Cream Cheese
Next, mix in the cream cheese until everything is well combined. This creamy mixture gives our pumpkin balls their delightful texture and flavor. Make sure there are no lumps; it should be smooth and easily moldable.
Step 3: Shape into Balls
Scoop out small amounts of the mixture and roll them into 1-inch balls. Place these on a parchment-covered baking sheet and refrigerate for about 15 minutes. Chilling helps them firm up so they hold their shape when we dip them.
Step 4: Add Pumpkin Details
Once chilled, take each ball and use a toothpick to score lines into the surface like little pumpkins. This fun detail makes them look extra festive! After this step, return them to the refrigerator for another 10 minutes.
Step 5: Melt the Candy Coating
While your pumpkin shapes chill again, melt the orange candy melts. You can do this over a double boiler or microwave them according to package directions. Get excited—the sweet aroma will fill your kitchen!
Step 6: Dip and Decorate
Now comes the fun part! Dip each pumpkin ball into the melted orange coating, letting any excess drip off before placing it back on the lined baking sheet. Quickly add your small pretzel stick on top as a stem, along with any green icing decorations you like.
Step 7: Chill Until Ready
Finally, pop your decorated Pumpkin Oreo Balls back into the refrigerator until you’re ready to serve. They’ll be perfectly set and ready to wow everyone with their adorable appearance and delicious flavor!
Pro Tips for Making Pumpkin Oreo Balls
Creating delicious Pumpkin Oreo Balls is a breeze, especially with these handy tips to ensure your treats turn out perfectly!
-
Use fresh cream cheese: Ensure your cream cheese is softened and at room temperature for a smooth mixture. This helps in achieving a well-blended, creamy filling that binds the Oreo crumbs perfectly.
-
Chill the mixture: After forming the balls, chilling them for a little while makes them easier to dip in melted chocolate. A firmer texture means less mess and a more polished finish.
-
Work with small batches: If you’re new to candy making, consider working with smaller batches of melted chocolate. This way, you can maintain the right consistency and keep the chocolate warm without it hardening too quickly.
-
Be creative with decorations: Don’t hesitate to add your personal touch! You can use mini chocolate chips for eyes or even colorful sprinkles for added flair, making each pumpkin ball unique.
-
Store properly: Keep your Pumpkin Oreo Balls in an airtight container in the refrigerator. They can last up to a week, but I promise they’ll be gone long before then!
How to Serve Pumpkin Oreo Balls
Presenting your Pumpkin Oreo Balls can elevate their appeal and make them a delightful centerpiece at any gathering. Here are some fun ideas to serve them up!
Garnishes
- Edible glitter: A sprinkle of edible glitter can add a magical touch that catches the eye.
- Chocolate drizzle: Drizzling extra melted orange or dark chocolate over the top creates an elegant look and extra flavor.
Side Dishes
- Fruit platter: A colorful assortment of seasonal fruits like apples and pears adds freshness and balances the sweetness of the Oreo balls.
- Cheese board: Pairing with a selection of soft cheeses adds a savory contrast that complements the sweet treats beautifully.
- Pumpkin spice latte: For a cozy drink option, serve these bites alongside warm pumpkin spice lattes that amplify that fall flavor.
- Vanilla ice cream: A scoop of vanilla ice cream can create a delightful dessert combo that will impress your guests.
Enjoy serving these delightful Pumpkin Oreo Balls at your next gathering – they’re sure to be a hit!
Make Ahead and Storage
These Pumpkin Oreo Balls are perfect for meal prep, allowing you to enjoy a delightful treat whenever the mood strikes. You can easily make them in advance and store them for later enjoyment.
Storing Leftovers
- Place any leftover Pumpkin Oreo Balls in an airtight container.
- Store in the refrigerator for up to one week.
- Keep them separated with parchment paper to avoid sticking.
Freezing
- Arrange the Pumpkin Oreo Balls in a single layer on a baking sheet.
- Freeze until solid, then transfer to an airtight container or freezer bag.
- They can be frozen for up to three months. Just thaw in the fridge before serving!
Reheating
- There’s no need to reheat these treats! Simply remove them from the refrigerator or freezer and enjoy them chilled.
- If desired, let them sit at room temperature for about 10 minutes for a softer texture.
FAQs
Got questions? Here are some common queries about making Pumpkin Oreo Balls!
Can I use other cookies instead of Oreos?
Absolutely! While Oreos give this recipe its signature flavor, you can experiment with other chocolate sandwich cookies or even vanilla-flavored ones for a different taste.
How do I achieve the best texture for my Pumpkin Oreo Balls?
Using softened cream cheese is key. It helps create that creamy filling that complements the cookie crumbles perfectly.
Are these Pumpkin Oreo Balls suitable for special occasions?
Yes! These Pumpkin Oreo Balls are ideal for parties, Halloween gatherings, or just a cozy night in. They bring festive flair and deliciousness to any event!
How long do Pumpkin Oreo Balls last?
When stored properly in the refrigerator, they can last up to one week. If frozen, they’ll keep well for about three months!
Final Thoughts
I hope you find joy in making these delightful Pumpkin Oreo Balls! They’re a fun and easy dessert that brings a touch of autumn into your home. Whether you’re sharing them with friends or enjoying them solo, I’m sure they’ll become a favorite treat. Happy baking, and don’t forget to share your creations!
Pumpkin Oreo Balls

Pumpkin Oreo Balls are the perfect no-bake dessert to celebrate the cozy flavors of fall! These delightful treats combine the sweetness of Oreo cookies with creamy cream cheese and are coated in vibrant orange candy melts, making them an eye-catching addition to any gathering. Easy to prepare and even more fun to decorate, they’re a hit with kids and adults alike. Ideal for parties, Halloween festivities, or just as a sweet afternoon snack, these Pumpkin Oreo Balls can be made in advance for your convenience. Simply chill until ready to serve and enjoy their irresistible flavor!
- Prep Time: 20 minutes
- Cook Time: 0 minutes
- Total Time: 20 minutes
- Yield: Approximately 24 servings 1x
- Category: Dessert
- Method: No-Bake
- Cuisine: American
Ingredients
- 36 Oreo cookies
- 8 oz cream cheese (softened)
- 12 oz orange candy melts
Instructions
- Crush the Oreo cookies in a food processor until finely crumbed.
- Mix the crushed Oreos with softened cream cheese until smooth.
- Roll the mixture into 1-inch balls and refrigerate for 15 minutes.
- Use a toothpick to score lines on each ball for pumpkin detailing; chill again for 10 minutes.
- Melt the orange candy melts according to package instructions.
- Dip each ball into the melted coating, letting excess drip off; add pretzel sticks or decorations while wet.
- Chill until set before serving.
Nutrition
- Serving Size: 1 serving
- Calories: 120
- Sugar: 10g
- Sodium: 60mg
- Fat: 7g
- Saturated Fat: 3g
- Unsaturated Fat: 4g
- Trans Fat: 0g
- Carbohydrates: 14g
- Fiber: 0g
- Protein: 1g
- Cholesterol: 10mg