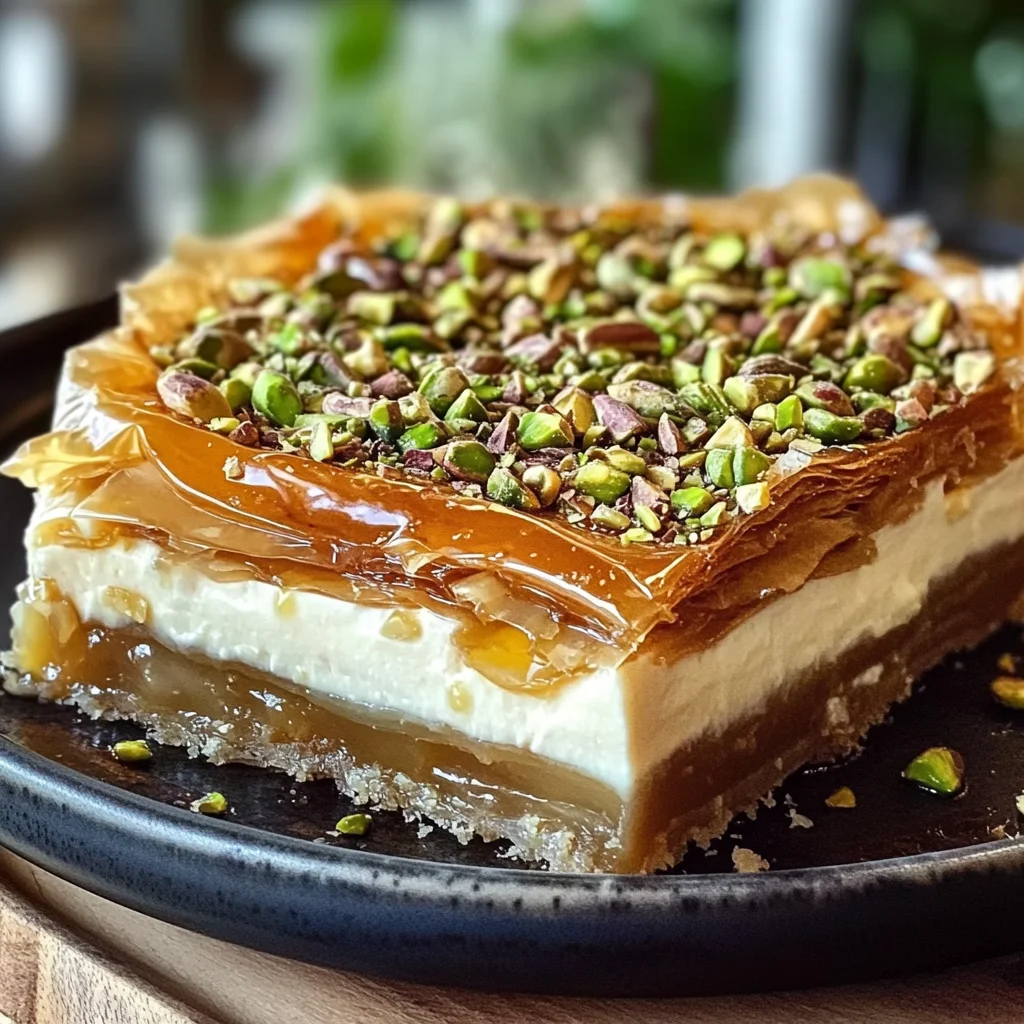
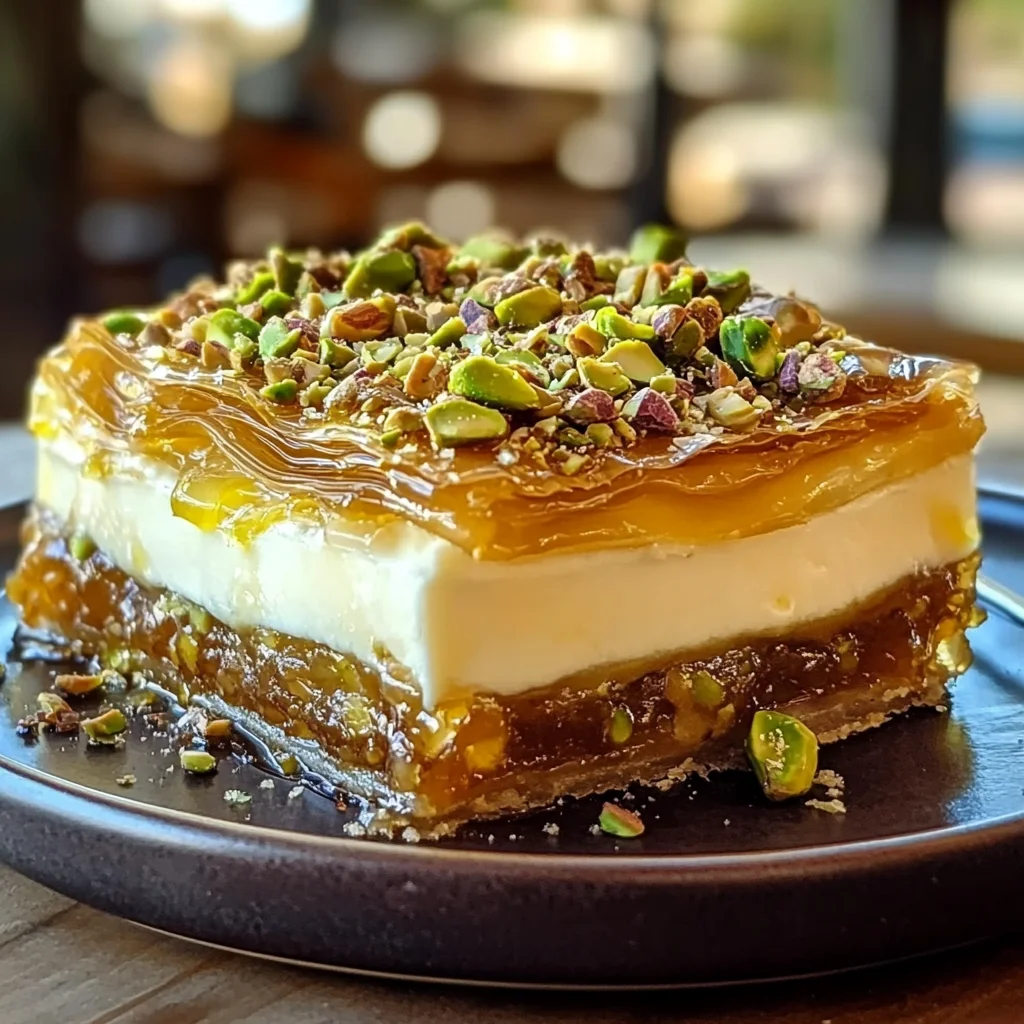
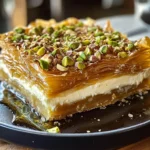
Honey Pistachio Baklava Cheesecake
If you’re looking for a dessert that impresses and delights, look no further! Honey Pistachio Baklava Cheesecake is one of those recipes that will have your friends and family begging for seconds. This dessert beautifully combines the creamy richness of cheesecake with the delightful crunch of baklava, creating a unique treat that feels special enough for any occasion. Whether it’s a family gathering or a cozy weeknight dinner, this cheesecake is sure to be the star of the show.
What makes this recipe even more exciting is how simple it is to prepare. You don’t need to be a baking expert to whip up this delightful fusion. With just a few wholesome ingredients, you can create a dessert that looks and tastes like it came from a high-end bakery. Let’s dive into why you’ll love making this Honey Pistachio Baklava Cheesecake!
Why You’ll Love This Recipe
- Unique Flavor Combination: The blend of creamy cheesecake and crunchy baklava layers creates an irresistible taste experience.
- Family-Friendly Appeal: Kids and adults alike will enjoy this dessert, making it perfect for gatherings.
- Make-Ahead Convenience: You can prepare the cheesecake in advance, allowing flavors to meld and saving you time on busy days.
- Impressive Presentation: The beautiful layers and toppings make it a stunning centerpiece for any table.
- Simple Ingredients: With easy-to-find ingredients, you won’t need to make a special trip to the store.
Ingredients You’ll Need
This Honey Pistachio Baklava Cheesecake uses simple, wholesome ingredients that come together beautifully. Here’s what you’ll need:
For the Baklava Base
- 10 sheets of phyllo pastry (thawed)
- Approx. 2 sticks unsalted butter, melted
- 1 cup roasted walnuts
- 1 cup roasted almonds
- 1 tsp. ground cinnamon
- 1/4 tsp. salt
- 2 Tbsp. melted butter
For the Cheesecake Filling
- 500g cream cheese, room temperature
- 1 cup granulated sugar
- Pinch of salt
- 2 tsp. vanilla extract
- 1 Tbsp. lemon zest
- 1 Tbsp. lemon juice
- 1 Tbsp. corn starch
- 3 large eggs, room temp.
- 250g strained Greek yogurt (or sour cream)
For the Topping
- 1 cup shelled pistachios (unsalted), coarsely chopped
- 1 cup honey
- 1 Tbsp. lemon juice
- Splash of rosewater
- More honey for drizzling
Variations
One of the best things about this recipe is its flexibility! You can easily adjust ingredients or add your own twist to make it your own.
- Use Different Nuts: Swap out walnuts and almonds for pecans or hazelnuts for a different flavor profile.
- Add Spices: Experiment with spices like nutmeg or cardamom in the nut mixture for added warmth.
- Fruit Twist: Incorporate fresh fruit like berries or citrus zest into the cheesecake layer for extra freshness.
- Vegan Option: Substitute cream cheese with vegan cream cheese and use flax eggs instead of traditional eggs.
How to Make Honey Pistachio Baklava Cheesecake
Step 1: Preheat Your Oven
Preheat your oven to 350°F (175°C). This step is crucial as it ensures even baking throughout your cheesecake. While your oven heats up, prepare an 8 to 10-inch springform pan by lining the base with trimmed parchment paper.
Step 2: Prepare the Phyllo Dough
Brush each phyllo sheet with melted butter, stacking them neatly in your springform pan. This creates that wonderful flaky texture we associate with baklava! Don’t forget to trim any overhanging phyllo before popping it into the oven for about 12 minutes until golden.
Step 3: Make the Nut Mixture
In a food processor, pulse together walnuts, almonds, cinnamon, and salt until they are crumbly but not too fine. Adding melted butter at this stage brings everything together nicely—spread this nut mixture evenly over your baked phyllo base.
Step 4: Mix the Cheesecake Filling
Now comes the fun part! In a bowl, mix cream cheese with sugar, salt, vanilla extract, lemon zest and juice, and cornstarch until smooth and creamy. Adding eggs one at a time helps maintain a silky texture before folding in Greek yogurt.
Step 5: Bake It All Together
Pour your luscious cheesecake filling over the nut layer in your springform pan and smooth out the top with a spatula. Bake on the middle rack for about 45 minutes until it’s just golden around the edges. Then turn off your oven but leave it inside for another 50 minutes—this gentle cooling helps prevent cracks.
Step 6: Cool and Top Off
Once cooled completely, top your cheesecake with honey mixed with lemon juice and rosewater for an aromatic finish! Finally, sprinkle generously with chopped pistachios before serving.
And there you have it—a show-stopping Honey Pistachio Baklava Cheesecake that’s sure to impress! Enjoy every bite of this delightful dessert!
Pro Tips for Making Honey Pistachio Baklava Cheesecake
Creating the perfect Honey Pistachio Baklava Cheesecake is a delightful experience, and with these pro tips, you’ll be well on your way to impressing your friends and family!
-
Thaw Phyllo Properly: Ensure your phyllo pastry is completely thawed before use. This prevents tearing and makes layering much easier, ensuring a beautiful crunchy base.
-
Use Room Temperature Ingredients: Allow your cream cheese and eggs to come to room temperature before mixing. This helps create a smooth filling without lumps, leading to that velvety cheesecake texture we all love.
-
Don’t Overbake: Keep an eye on the cheesecake while it bakes. It should have a slight jiggle in the center when you take it out. This ensures it remains creamy and isn’t overcooked.
-
Cool Gradually: Allow the cheesecake to cool in the oven after baking. This gradual cooling prevents cracks from forming on the surface, keeping your dessert looking flawless.
-
Serve Chilled: For the best flavor and texture, chill your cheesecake for at least 4 hours or overnight before serving. This allows the flavors to meld beautifully and enhances its creaminess.
How to Serve Honey Pistachio Baklava Cheesecake
Presenting your Honey Pistachio Baklava Cheesecake can elevate it from a simple dessert to a stunning centerpiece for any occasion! Here are some ideas to make it shine.
Garnishes
- Chopped Pistachios: Sprinkle additional coarsely chopped pistachios on top for added crunch and color.
- Drizzle of Honey: A light drizzle of honey just before serving adds an extra touch of sweetness that complements the flavors perfectly.
- Mint Leaves: Fresh mint leaves can add a pop of color and a refreshing contrast to the rich sweetness of the cheesecake.
Side Dishes
- Turkish Coffee: The bold flavors of Turkish coffee pair wonderfully with the sweetness of baklava cheesecake, creating a delightful balance that enhances both dishes.
- Fresh Fruit Salad: A light fruit salad made with citrus fruits can provide a refreshing contrast to the richness of the cheesecake, cleansing the palate beautifully.
- Vanilla Ice Cream: Creamy vanilla ice cream served alongside brings another layer of indulgence and complements the honey and nut flavors perfectly.
- Spiced Tea: A warm cup of spiced tea offers aromatic flavors that harmonize well with this dessert, making each bite even more enjoyable.
There you have it! With these serving suggestions and pro tips, you’re ready to bring this exquisite dessert to life and share it with loved ones. Enjoy every delicious moment!
Make Ahead and Storage
This Honey Pistachio Baklava Cheesecake is perfect for meal prep and can be made a few days in advance. Its flavors deepen over time, making it an excellent choice for special occasions or gatherings.
Storing Leftovers
- Allow the cheesecake to cool completely before storing.
- Cover the cheesecake with plastic wrap or aluminum foil.
- Store in the refrigerator for up to 5 days.
Freezing
- Wrap individual slices or the whole cheesecake tightly in plastic wrap.
- Place wrapped cheesecake in an airtight container or freezer bag.
- Freeze for up to 3 months for best quality.
Reheating
- Thaw the cheesecake overnight in the refrigerator if frozen.
- For a warm slice, microwave on low power for about 10-15 seconds.
- Enjoy chilled or slightly warmed—both ways are delicious!
FAQs
If you have questions about this delightful dessert, you’re in the right place! Here are some common inquiries:
Can I use other nuts instead of pistachios in Honey Pistachio Baklava Cheesecake?
Absolutely! While pistachios add a unique flavor, you can substitute them with your favorite nuts like almonds or walnuts. Just ensure they are unsalted and roasted for the best taste.
How long can I store Honey Pistachio Baklava Cheesecake?
You can store your Honey Pistachio Baklava Cheesecake in the refrigerator for up to 5 days. If you want to keep it longer, consider freezing it!
Can I make Honey Pistachio Baklava Cheesecake without cream cheese?
Yes! You can substitute cream cheese with a vegan cream cheese alternative or a silken tofu blend for a dairy-free version. The texture might be slightly different but still delightful!
Is there an alternative to phyllo pastry for this recipe?
If you’re looking for alternatives, you could use crushed graham crackers mixed with melted butter as a base. However, it won’t replicate the flaky texture of phyllo pastry.
Final Thoughts
I hope you feel inspired to try making this Honey Pistachio Baklava Cheesecake! It truly is a special dessert that combines two beloved treats into one indulgent experience. Whether it’s for a celebration or just because, this cheesecake is sure to impress. Enjoy every bite and don’t forget to share your delicious results with friends and family!
Honey Pistachio Baklava Cheesecake
Indulge in the delightful fusion of flavors with our Honey Pistachio Baklava Cheesecake. This unique dessert masterfully blends the creamy richness of cheesecake with the crispy texture of baklava, creating a treat that is both visually stunning and irresistibly delicious. Perfect for special occasions or casual gatherings, this cheesecake is sure to impress your friends and family, leaving them craving more. With simple ingredients and straightforward preparation steps, you’ll find this recipe easy to follow, whether you’re an experienced baker or just starting out.
- Prep Time: 30 minutes
- Cook Time: 57 minutes
- Total Time: 1 hour 27 minutes
- Yield: Approximately 12 servings 1x
- Category: Dessert
- Method: Baking
- Cuisine: Mediterranean
Ingredients
- 10 sheets of phyllo pastry, thawed
- Approx. 2 sticks unsalted butter, melted
- 1 cup roasted walnuts
- 1 cup roasted almonds
- 1 tsp. ground cinnamon
- 1/4 tsp. salt
- 2 Tbsp. melted butter
- 500g cream cheese, room temperature
- 1 cup granulated sugar
- Pinch of salt
- 2 tsp. vanilla extract
- 1 Tbsp. lemon zest
- 1 Tbsp. lemon juice
- 1 Tbsp. corn starch
- 3 large eggs, room temp.
- 250g strained Greek yogurt
- 1 cup shelled pistachios (unsalted), coarsely chopped
- 1 cup honey
- 1 Tbsp. lemon juice
- Splash of rosewater
- More honey for drizzling
Instructions
- Preheat your oven to 350°F (175°C) and prepare an 8 to 10-inch springform pan with parchment paper.
- Brush each phyllo sheet with melted butter, stacking them in the prepared pan. Bake for about 12 minutes until golden.
- In a food processor, pulse walnuts, almonds, cinnamon, and salt until crumbly. Mix in melted butter and spread evenly over the baked phyllo base.
- In a bowl, combine cream cheese, sugar, salt, vanilla extract, lemon zest and juice, cornstarch, and eggs until smooth. Fold in Greek yogurt.
- Pour the cheesecake mixture over the nut layer and bake for approximately 45 minutes until golden around the edges; then let cool in the oven for another 50 minutes.
- Once cool, top with honey mixed with lemon juice and generously sprinkle chopped pistachios before serving.
Nutrition
- Serving Size: 1 slice (approximately 120g)
- Calories: 360
- Sugar: 25g
- Sodium: 150mg
- Fat: 24g
- Saturated Fat: 10g
- Unsaturated Fat: 14g
- Trans Fat: 0g
- Carbohydrates: 32g
- Fiber: 2g
- Protein: 7g
- Cholesterol: 90mg